Going trough the Arduino examples
If I really want to understand this board, I've got to do more things!My starting point:
https://www.arduino.cc/en/Tutorial/BuiltInExamples
I've got to say; Arduino guys, the website and examples are a job well done, very detailed!
The first exercise is with the potentiometer:
https://www.arduino.cc/en/Tutorial/AnalogReadSerial
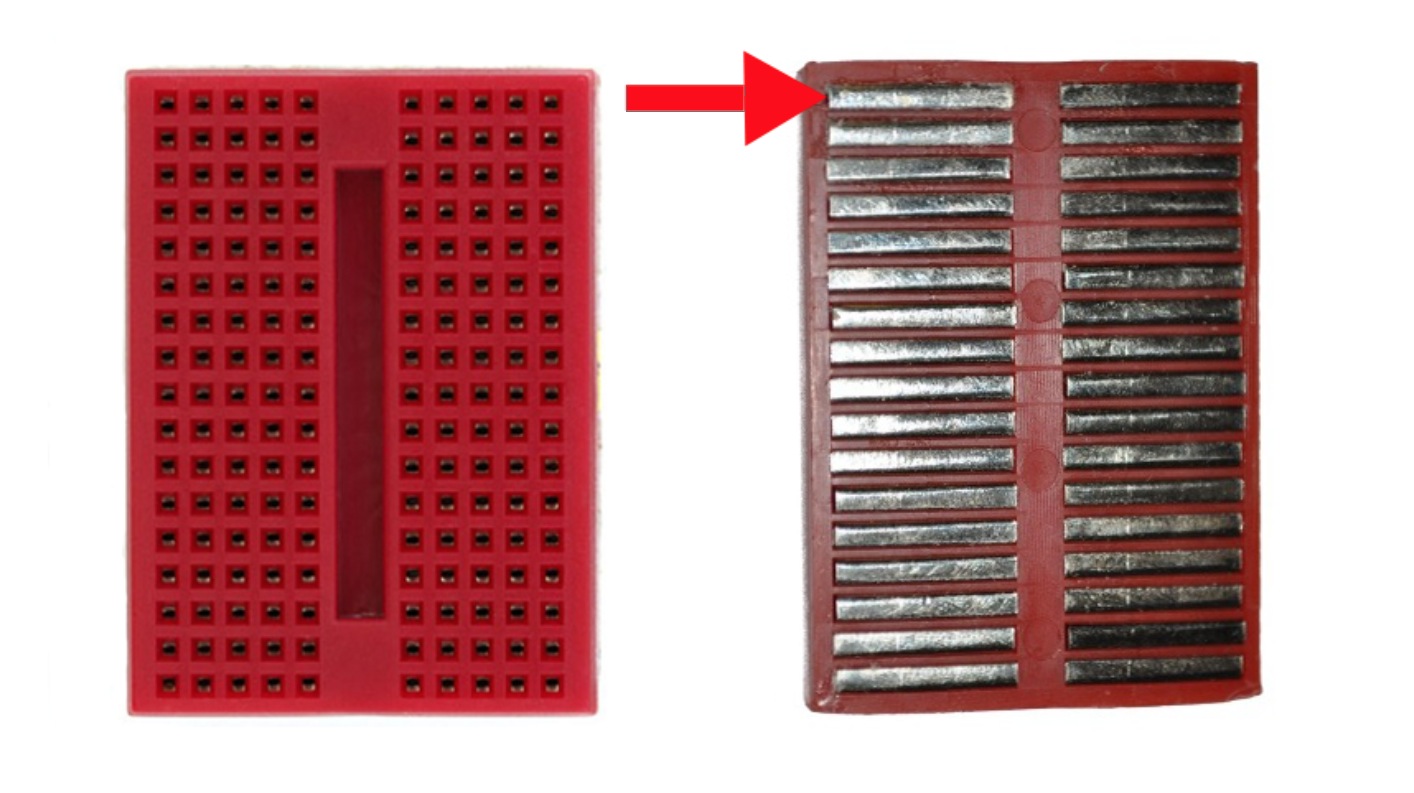
Extra to the example of the Arduino website, I'm already using the mini bread board to make it easy. To use the bread board (and know how the pins are connected), this picture illustrates very nicely:

I've uploaded the Basic 01 > AnalogReadSerial code, and using the serial monitor (looking like a lens at the top right of the IDE) I can, changing the potentiometer, have a reading range from 0 to 1023.
Now I clearly see already that using this wont be easy in a step of one (like 212 -> 213 -> 214). If this is used, you'll better program ranges (by example in blocks of 100, which results in practically 10 levels).
But this exercise is nicely showing how you can use (and measure) a 0 Volt to 5 Volt range as input in the analog sensors of the Arduino board.
As there are 6 analog sensors on the Arduino board, you can attach 6 potentiometers and read their values (A0 to A5).
So combining the Basic exercise of blink and AnalogReadSerial, this example show to use a potentiometer to get the led L to turn on when the potentiometer is below 500, and to turn off when above or equal to 500:
// the setup routine runs once when you press reset:
void setup() {
// initialize serial communication at 9600 bits per second:
Serial.begin(4800);
//initialize led
pinMode(13, OUTPUT);
}
// the loop routine runs over and over again forever:
void loop() {
// read the input on analog pin 0:
int sensorValue = analogRead(A0);
// print out the value you read:
Serial.println(sensorValue);
delay(1); // delay in between reads for stability
if (sensorValue < 500)
{
digitalWrite(13, HIGH);
}
else
{
digitalWrite(13, LOW);
}
}
Next steps (while going through exercises) are to make it better responsive. The delay() function is great for simple operations, but it makes actions (or reactions) of the board while changing the potentiometer slow. And while you're adding more and more instructions and code, you don't want that.
A solution is by using the millis() function, which returns the time that the Arduino board is running, and compare the delta with this time.
const long minimaldelta = 5;
//the minimum in ms to allow visible blinking
unsigned long time;
unsigned long step = 0;
int ledstate = LOW;
// the setup routine runs once when you press reset:
void setup()
{
// initialize serial communication at 9600 bits per second: Serial.begin(9600);
//initialize led
pinMode(13, OUTPUT);
}
// the loop routine runs over and over again forever:
void loop()
{
// read the input on analog pin 0:
int sensorValue = analogRead(A0);
// print out the value you read:
time = millis();
Serial.print("Sensor:");
Serial.println(sensorValue);
Serial.print("Time: ");
Serial.println(time);
delay(1); // delay in between reads for stability
if (step + sensorValue + minimaldelta < time) {
step = time;
if (ledstate == LOW){
ledstate = HIGH;
} else {
ledstate = LOW;
}
digitalWrite(13, ledstate);
}
Still very basic though :)

