zaterdag 19 maart 2016

Going trough the Arduino examples

Going trough the Arduino examples

If I really want to understand this board, I've got to do more things!

My starting point:
https://www.arduino.cc/en/Tutorial/BuiltInExamples

I've got to say; Arduino guys, the website and examples are a job well done, very detailed!

The first exercise is with the potentiometer:

https://www.arduino.cc/en/Tutorial/AnalogReadSerial

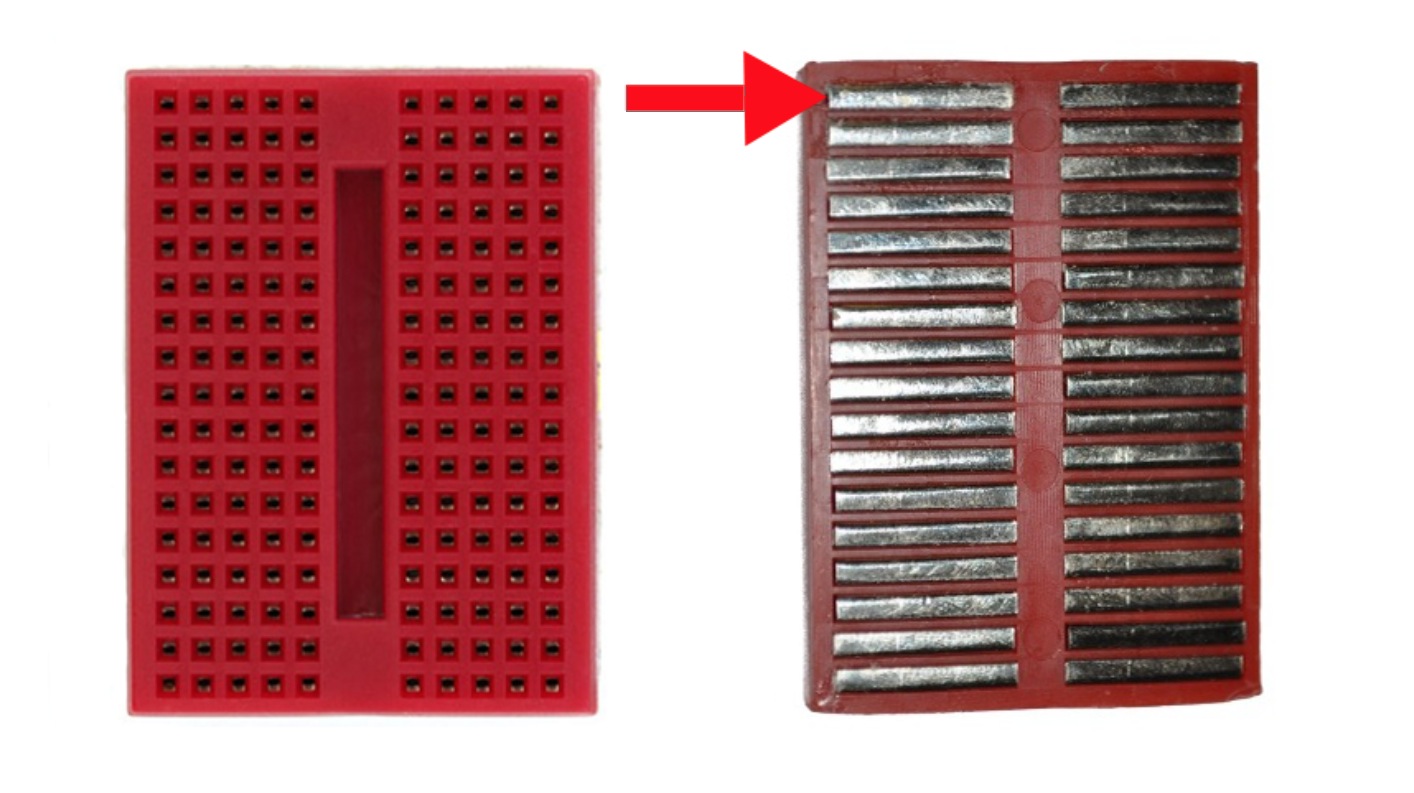
Extra to the example of the Arduino website, I'm already using the mini bread board to make it easy. To use the bread board (and know how the pins are connected), this picture illustrates very nicely:
You can push in the potentiometer like this and attach the wires accordingly:


I've uploaded the Basic 01 > AnalogReadSerial code, and using the serial monitor (looking like a lens at the top right of the IDE) I can, changing the potentiometer, have a reading range from 0 to 1023.

Now I clearly see already that using this wont be easy in a step of one (like 212 -> 213 -> 214). If this is used, you'll better program ranges (by example in blocks of 100, which results in practically 10 levels).

But this exercise is nicely showing how you can use (and measure) a 0 Volt to 5 Volt range as input in the analog sensors of the Arduino board.

As there are 6 analog sensors on the Arduino board, you can attach 6 potentiometers and read their values (A0 to A5).

So combining the Basic exercise of blink and AnalogReadSerial, this example show to use a potentiometer to get the led L to turn on when the potentiometer is below 500, and to turn off when above or equal to 500:

// the setup routine runs once when you press reset:
void setup() {
   // initialize serial communication at 9600 bits per second:
  Serial.begin(4800);

  //initialize led
  pinMode(13, OUTPUT);

}

// the loop routine runs over and over again forever:
void loop() {
  // read the input on analog pin 0:
  int sensorValue = analogRead(A0);
  // print out the value you read:
  Serial.println(sensorValue);
  delay(1);        // delay in between reads for stability


  if (sensorValue < 500)
  {
     digitalWrite(13, HIGH);
  }
  else
  {
     digitalWrite(13, LOW);
  }

}

Next steps (while going through exercises) are to make it better responsive. The delay() function is great for simple operations, but it makes actions (or reactions) of the board while changing the potentiometer slow. And while you're adding more and more instructions and code, you don't want that.

A solution is by using the millis() function, which returns the time that the Arduino board is running, and compare the delta with this time.

const long minimaldelta = 5;  
      //the minimum in ms to allow visible blinking


unsigned long time;
unsigned long step = 0;
int ledstate = LOW;


// the setup routine runs once when you press reset:
void setup()
{
  // initialize serial communication at 9600 bits per second:   Serial.begin(9600);
  //initialize led
  pinMode(13, OUTPUT);
}

// the loop routine runs over and over again forever:
void loop()
{
  // read the input on analog pin 0:        
  int sensorValue = analogRead(A0);
  // print out the value you read:
  time = millis();
  Serial.print("Sensor:");
  Serial.println(sensorValue);
  Serial.print("Time: ");
  Serial.println(time);

  delay(1);        // delay in between reads for stability

  if (step + sensorValue + minimaldelta < time)  {
     step = time;       
     if (ledstate == LOW){
      ledstate = HIGH;
     } else {
      ledstate = LOW;
     }
     digitalWrite(13, ledstate);
  }

}

Still very basic though :)

How do I start with Arduino?

How do I start?

After unwrapping everything, the first steps are to get a connection from my computer with this board, and getting it to turn on a light or something (will have to find out what the first exercises will be).

You start here: https://www.arduino.cc/en/Guide/HomePage
  • Read an introduction on what is Arduino and why you'd want to use it.
  • What is the Arduino Software (IDE) and how do I change the default language? 


  • I'm running Windows 10, so I need the Windows version of the IDE. https://www.arduino.cc/en/Guide/Windows

    I've downloaded the installer version, arduino-1.6.8-windows.

    #Issue 1: I need a longer USB cable (A plug to B plug)!
    The cable that is shipped with my package is 40cm long, that's short to get to an USB port on my PC tower. Lucky me, I've still got a old 1 meter cable from an old HP printer.

    I've connected the USB cable to this small Arduino board; the green power indicator is "on".

    Followed the instructions, Launched the Arduino software. Set my Port to COM3 in the interface. Loaded the application 01 Basic > Blink. Clicked the upload button and Yes, the led (L) is blinking!

    #Issue 2: Hey wait a minute, this Led was blinking already since I've connected the Arduino board for the first time. I've changed delay's in the program (2 seconds on, 0.500 seconds off), uploaded, yes! Apparently the first "basic" program is on the board by default...
    I'm linking this :) -- like a child unwrapping its toy!
    Also happy I didn't need the troubleshooting https://www.arduino.cc/en/Guide/Troubleshooting

    My Arduino has arrived!

    My Arduino has arrived!

    was checking my mailbox daily as I was eager to start with this :) and after two and a half weeks I've finally got my shipment.

    This is how it looked like (with a nice plastic box):


    I bought quality stuff, everything is wrapped in plastic or static shield bags, this hasn't been used before. (on eBay many of the complaints are that components look used).


    Starting with buying an Arduino Starter Kit

    Starting with buying an Arduino Starter Kit

    I'm not one of the early adopters of Arduino. I did however, when I was a student in Masters for Electronics her in Belgium in the 90's, program in assembler the Motorola 68000 and the Intel 8088 microprocessors. So this Arduino thing shouldn't be that much of a challenge, right?

    From day one I've started working I've been a Windows System Engineer. Server systems, server hardware, data centers, recovery, SLA's, powershell, Active Directory nah no much secrets in that world for me anymore. Looking for a challenge, I was quite intrigued by the raspberry PI, such a small device running an OS, that has to be fun.

    When thinking of a first concept that I wanted to do with the Raspberry, I was searching for a battery enabled PI with a long lifetime, and clearly discovered this was not what I was looking for; a PI is a board that has a low power consumption compared to PC's, but it's not suited for long time battery usage (without recharging daily). Read more here.

    Colleagues at work showed me into  the Arduino board, which is more suited (but not with an OS) for battery powered tasks (like sensing a door opening).

    Searching the internet resulted in an overload of information! This Arduino thing is quite adopted with a huge community. Nice. But where can I buy this?

    Some e-shops in the Benelux:
    Others that are interesting:
    I've bought my first starter kit via e-Bay from an Italian seller for € 39 (shipping included): "kit starter uno per arduino starter kit one for Arduino 970714" . It is the lowest price for a kit I've found with a good scoring on e-Bay (100%). 


    Okay, lets "start"...